I had all but given up working on the car this weekend, then things just fell into place. Here's some video of the first drive(s)...
http://picasaweb.google.com/R1.SE7EN/FirstDrive?authkey=Gv1sRgCOXMkJ6Pm5HsfA&feat=directlink
Last weekend I attempted to take the car for a spin but things just didn't work out. First the battery was dead, so I had to jump start. I pushed in the clutch, shifted into gear and slowly let out the clutch...nothing...then the engine puttered out with a puff of smoke coming out the throttle bodies...I tried starting the engine again but it barely cranked over.
After searching on google I realized that I overextended the clutch which locks it into the open position, google is your friend. I ordered a new gasket for the clutch cover and an additional spring plate, lots of BECs run double spring plates as an "upgrade", figured now would be the time to do this.
Parts hadn't arrived yet but today was a nice sunny day, I had time and motivation so decided to try to fix the clutch and reuse the gasket "temporarily" until the parts came in. Turns out the clutch fix was easy, just take off the cover, reengage the gear, then reassemble. Battery still didn't hold a charge but I was able to coast start down the driveway, popped in into gear and drove away...

Building an R1 Powered Seven
A few years ago I got it in my head to build a kit car. After months of searching I came across the Locost concept. In short, quite a few amateur hobbiests around the world have built their own Lotus 7 inspired cars from scratch, following plans available on a variety of Internet sites and published in a book by Ron Champion.
I started gathering parts and finally began building the chassis in July '05. In August '10 the car was titled, licensed and is now street legal. The following blog captures the progress of the build and driving experiences after completion.
Links
Blog Posts
Sunday, November 29, 2009
First Drive!
Posted by
r1.se7en
at
7:06 PM
![]()
Sunday, October 4, 2009
Axles Installed
I assembled the CV joints and installed the axles today. The boots fit okay despite the larger diameter axles, although I won't be surprised if they develop cracks sooner than normal.
The picture on the left shows the original Miata axle on top, and the new axle from Dutchman Motorsports on the bottom. To the right is the assembled axle with CV joints.
Installing the axles went pretty well although I did need to "customize" a socket to get to the inner bolts. I expected to have to remove the uprights to get the axles in but since the inner joints slide I was to work them into place without taking anything apart.
Posted by
r1.se7en
at
4:41 PM
![]()
Saturday, September 26, 2009
Miata Inner CV Joints
Thanks to google images I was able to find a picture of a few inner joints without boots. The picture on the right is correct.
Posted by
r1.se7en
at
12:17 PM
![]()
Sunday, September 6, 2009
Ignition!
I rolled the car outside today and decided to add fluids. First coolant...no leaks, then oil, then gas...still no leaks. I turned on the ignition and ran the fuel pump...still no leaks. Then decided to give it a try. After cranking for a few seconds it started up and ran great. A bit loud a first so I put the airbox on, helped a lot.
I could hear a few exhaust leaks and felt around to see where they were coming from. Two from the muffler where I drilled out rivets, will be an easy fix, another between the headers/collector. I'll need to think about how to fix that one...
Also the tach wasn't working, turns out I had switched a wire, fixed now...
But aside from these few issues it felt great, and went much better than expected. Did I say there were no leaks?!
I let it idle for a while, get up to temperature to see if the fan came on (it did), then shut it down.
Now I really want the axles back...
Next step will be to add brake fluid/bleed the brakes, then I can fix the exhaust leaks while waiting for the axles.
Here's a video from today:
Posted by
r1.se7en
at
5:05 PM
![]()
Sunday, August 30, 2009
On the ground
Posted by
r1.se7en
at
5:18 PM
![]()
Sunday, August 23, 2009
Wiring checks out
A good nights sleep always helps.
This morning I tore apart the harness that I spent hours neatly wrapping to figure out why the headlights and tail lights weren't working. I noticed that there were two yellow/black wires coming out of the ECU, one went to the meter assembly, the other to the headlight relay...maybe I mixed them up when splicing wires....
Turns out that wasn't the case, the motorcycle daylight running lights are linked to engine speed. i.e. when the engine is off the headlight is off. I ran a direct ground to the headlight relay (instead of the yellow/black wire from the ECU) and the lights worked.
The tail lights were an easy fix, closer inspection of the lights showed a terminal layout, I had the wires mixed up.
With that, everything works! Once I add oil, coolant and fuel the engine should run...
Posted by
r1.se7en
at
6:43 PM
![]()
Saturday, August 22, 2009
Electricity
I wired up the last few lights today and decided to test things out. It has been a while since I did most of the wiring so I was anxious to see if things worked.
...so I hooked up the battery and turned the ignition switch, carefully listening and looking for strange sounds/sparks/smoke (you never know), as soon as I turned the switch....BEEEEEEEEEEP !!!! &$?!*!?! It's amazing how loud a motorcycle horn can be inside your garage.
I turned off the ignition, took a few deep breaths to bring my heartbeat back to normal, then scratched my head trying to figure out what happened. Tested the horn button, seemed okay, then pressed it a little harder and "click". That's odd, a momentary switch shouldn't click...turns out it's an on/off pushbutton switch (that happened to be in the on position).
With the horn temporarily fixed I tried again, no horn, but the turn signals were flashing. Didn't take long to figure out that I used the same switchs for the horn button and turn signals...
I didn't see any smoke or hear strange noises so proceeded to check everything out
fuel pump, starter, front turn signals, front marker lights...check!
rear turn signals, brakes, marker lights and headlights...nothing...
Tomorrow is another day...
Posted by
r1.se7en
at
10:03 PM
![]()
Sunday, June 28, 2009
Saturday, May 9, 2009
Sunday, April 19, 2009
Sunday, April 12, 2009
Sunday, March 22, 2009
Spagetti
On to the wiring. I decided to unwrap the entire R1 harness to make it easier to reposition components, cut, splice, etc. Not sure if it was the tangle of wires or the change in weather, but after about an hour working on the car I had a splitting headache...400mg of ibuprofen later and I was ready to start making sense of the mess.
Once I started laying things out, it really wasn't too bad. The hardest part will be cutting/splicing the wires once I figure out where to mount all the components.
I got the ECU, voltage regulator and starter relay mounted today.

Posted by
r1.se7en
at
2:21 PM
![]()
Sunday, February 22, 2009
Headers & Exhaust
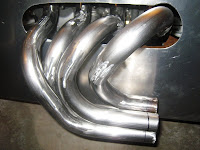
Aside from the muffler mount and paint, the exhaust is complete. Oh, and I need to weld on tabs for the collector springs. I may also add a heat shield later.
I started by cutting the R1 exhaust pipe about 1.5" from the muffler, then used a length of 2.25" O.D. exhaust pipe between collector and the muffler. The R1 exhaust is 2.25" I.D. so it was a nice snug fit to the 2.25" pipe. Since the CTE of steel is higher than titanium, it should only get tighter with heat. 

On the collector end, I rolled two beads to get a snug fit on the 2" O.D. outlet, then tapped everything together. I bought some exhaust clamps, but as tight as things went together, I'll leave them off for now.
The finished welding up the headers. I tried to get the welds to look nice, but I'm a little out of practice so I gave up and ground and sanded the welds in the end.
Posted by
r1.se7en
at
5:22 PM
![]()
Saturday, February 14, 2009
Headers
I worked on the exhaust some yesteday and again today. First fabricated the ends that bolt up to the engine using 0.75" lengths of 1.75" O.D. x 1.5" I.D. tube, pressed and welded onto short pieces of 1.5" exhaust tubing. I was able to reuse the flanges from the bike exhaust.

Then it was on to the headers. It helped a lot to have the lengths already figured out in Solidworks, so I just need to mark and cut the pieces. I used an exhaust tubing cutter I picked up at Harbor freight. I almost didn't buy it because it was about $50, but it worked great and was worth the cost. It even worked on the curved tube (3" radius), just need to be a little more carefull when starting so it doesn't jump out of the cut line.

Sunday, February 15, 2009
I finished fitting and tacked together the headers.
Next step is to figure out the transition to the R1 muffler.
Posted by
r1.se7en
at
3:13 PM
![]()


