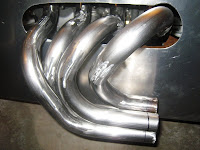
Aside from the muffler mount and paint, the exhaust is complete. Oh, and I need to weld on tabs for the collector springs. I may also add a heat shield later.
I started by cutting the R1 exhaust pipe about 1.5" from the muffler, then used a length of 2.25" O.D. exhaust pipe between collector and the muffler. The R1 exhaust is 2.25" I.D. so it was a nice snug fit to the 2.25" pipe. Since the CTE of steel is higher than titanium, it should only get tighter with heat. 

On the collector end, I rolled two beads to get a snug fit on the 2" O.D. outlet, then tapped everything together. I bought some exhaust clamps, but as tight as things went together, I'll leave them off for now.
The finished welding up the headers. I tried to get the welds to look nice, but I'm a little out of practice so I gave up and ground and sanded the welds in the end.

Building an R1 Powered Seven
A few years ago I got it in my head to build a kit car. After months of searching I came across the Locost concept. In short, quite a few amateur hobbiests around the world have built their own Lotus 7 inspired cars from scratch, following plans available on a variety of Internet sites and published in a book by Ron Champion.
I started gathering parts and finally began building the chassis in July '05. In August '10 the car was titled, licensed and is now street legal. The following blog captures the progress of the build and driving experiences after completion.
Links
Blog Posts
Sunday, February 22, 2009
Headers & Exhaust
Posted by
r1.se7en
at
5:22 PM
![]()
Saturday, February 14, 2009
Headers
I worked on the exhaust some yesteday and again today. First fabricated the ends that bolt up to the engine using 0.75" lengths of 1.75" O.D. x 1.5" I.D. tube, pressed and welded onto short pieces of 1.5" exhaust tubing. I was able to reuse the flanges from the bike exhaust.

Then it was on to the headers. It helped a lot to have the lengths already figured out in Solidworks, so I just need to mark and cut the pieces. I used an exhaust tubing cutter I picked up at Harbor freight. I almost didn't buy it because it was about $50, but it worked great and was worth the cost. It even worked on the curved tube (3" radius), just need to be a little more carefull when starting so it doesn't jump out of the cut line.

Sunday, February 15, 2009
I finished fitting and tacked together the headers.
Next step is to figure out the transition to the R1 muffler.
Posted by
r1.se7en
at
3:13 PM
![]()
Wednesday, February 11, 2009
Scuttle and Side Panels
Here are some pics of the used scuttle purchased at http://www.rmsci.com/


Side Panels:
Posted by
r1.se7en
at
5:47 PM
![]()
Sunday, February 8, 2009
Fuel Pump & Steering Tie Rods
I relocated the fuel pump and moved the outlet port on the tank from the top (with pickup hose) to the bottom side of the tank. This created a little extra storage space in front of the tank, and now the pump is gravity fed from the tank.

I also made one of the steering tie rod extensions using a 0.75" OD x 0.156" wall tube, tapped 1/2-20 on one end to match the tie rod, and 12x1.25mm on the other and used high strength threaded rod to connect to the Miata tie rod end. More tube is on order for the second side.
Posted by
r1.se7en
at
8:01 PM
![]()
Sunday, February 1, 2009
Superbowl Sunday
The sides are finally done. I still need to drill and rivet on, but will hold off unitl I know they don't need to come off again. The bonnet, scuttle and fender are just sitting in place, need to do some minor fitting.. The colors will change, still planning to go white white and polished aluminum like the picture in the blog, but we'll see...

Posted by
r1.se7en
at
8:01 PM
![]()


